
One of my goals recently was to make a dashboard for my office to display information that is relevant to me. The TV in my office generally goes unused (other than to show the occasional MLB day game) so it makes a great display for a dashboard.
As an elixir enthusiast, I decided to use the phoenix framework to build the app. Elixir (and Erlang that powers it) offers high performance and concurrency. Of course, this small app with only 1 user doesn’t really require those features, but there were a couple of features unique to phoenix and elixir I wanted to leverage; Specifically, channels, and genservers.
Part 1: Software
The entire source of the dashboard app can be found here: https://github.com/supersimple/dashboard
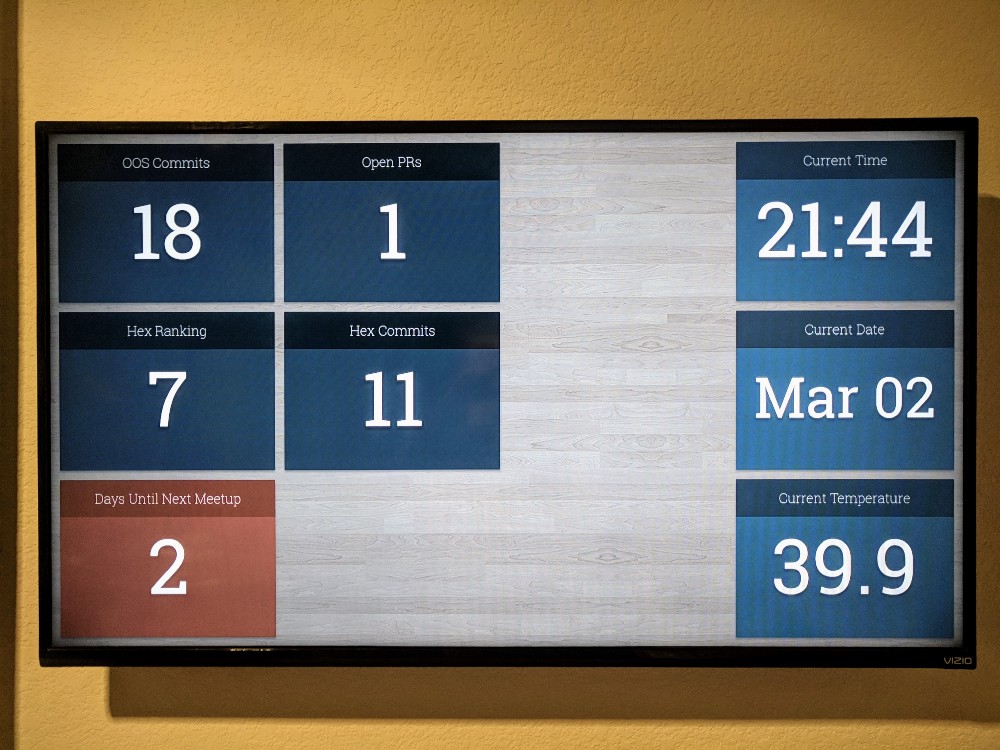
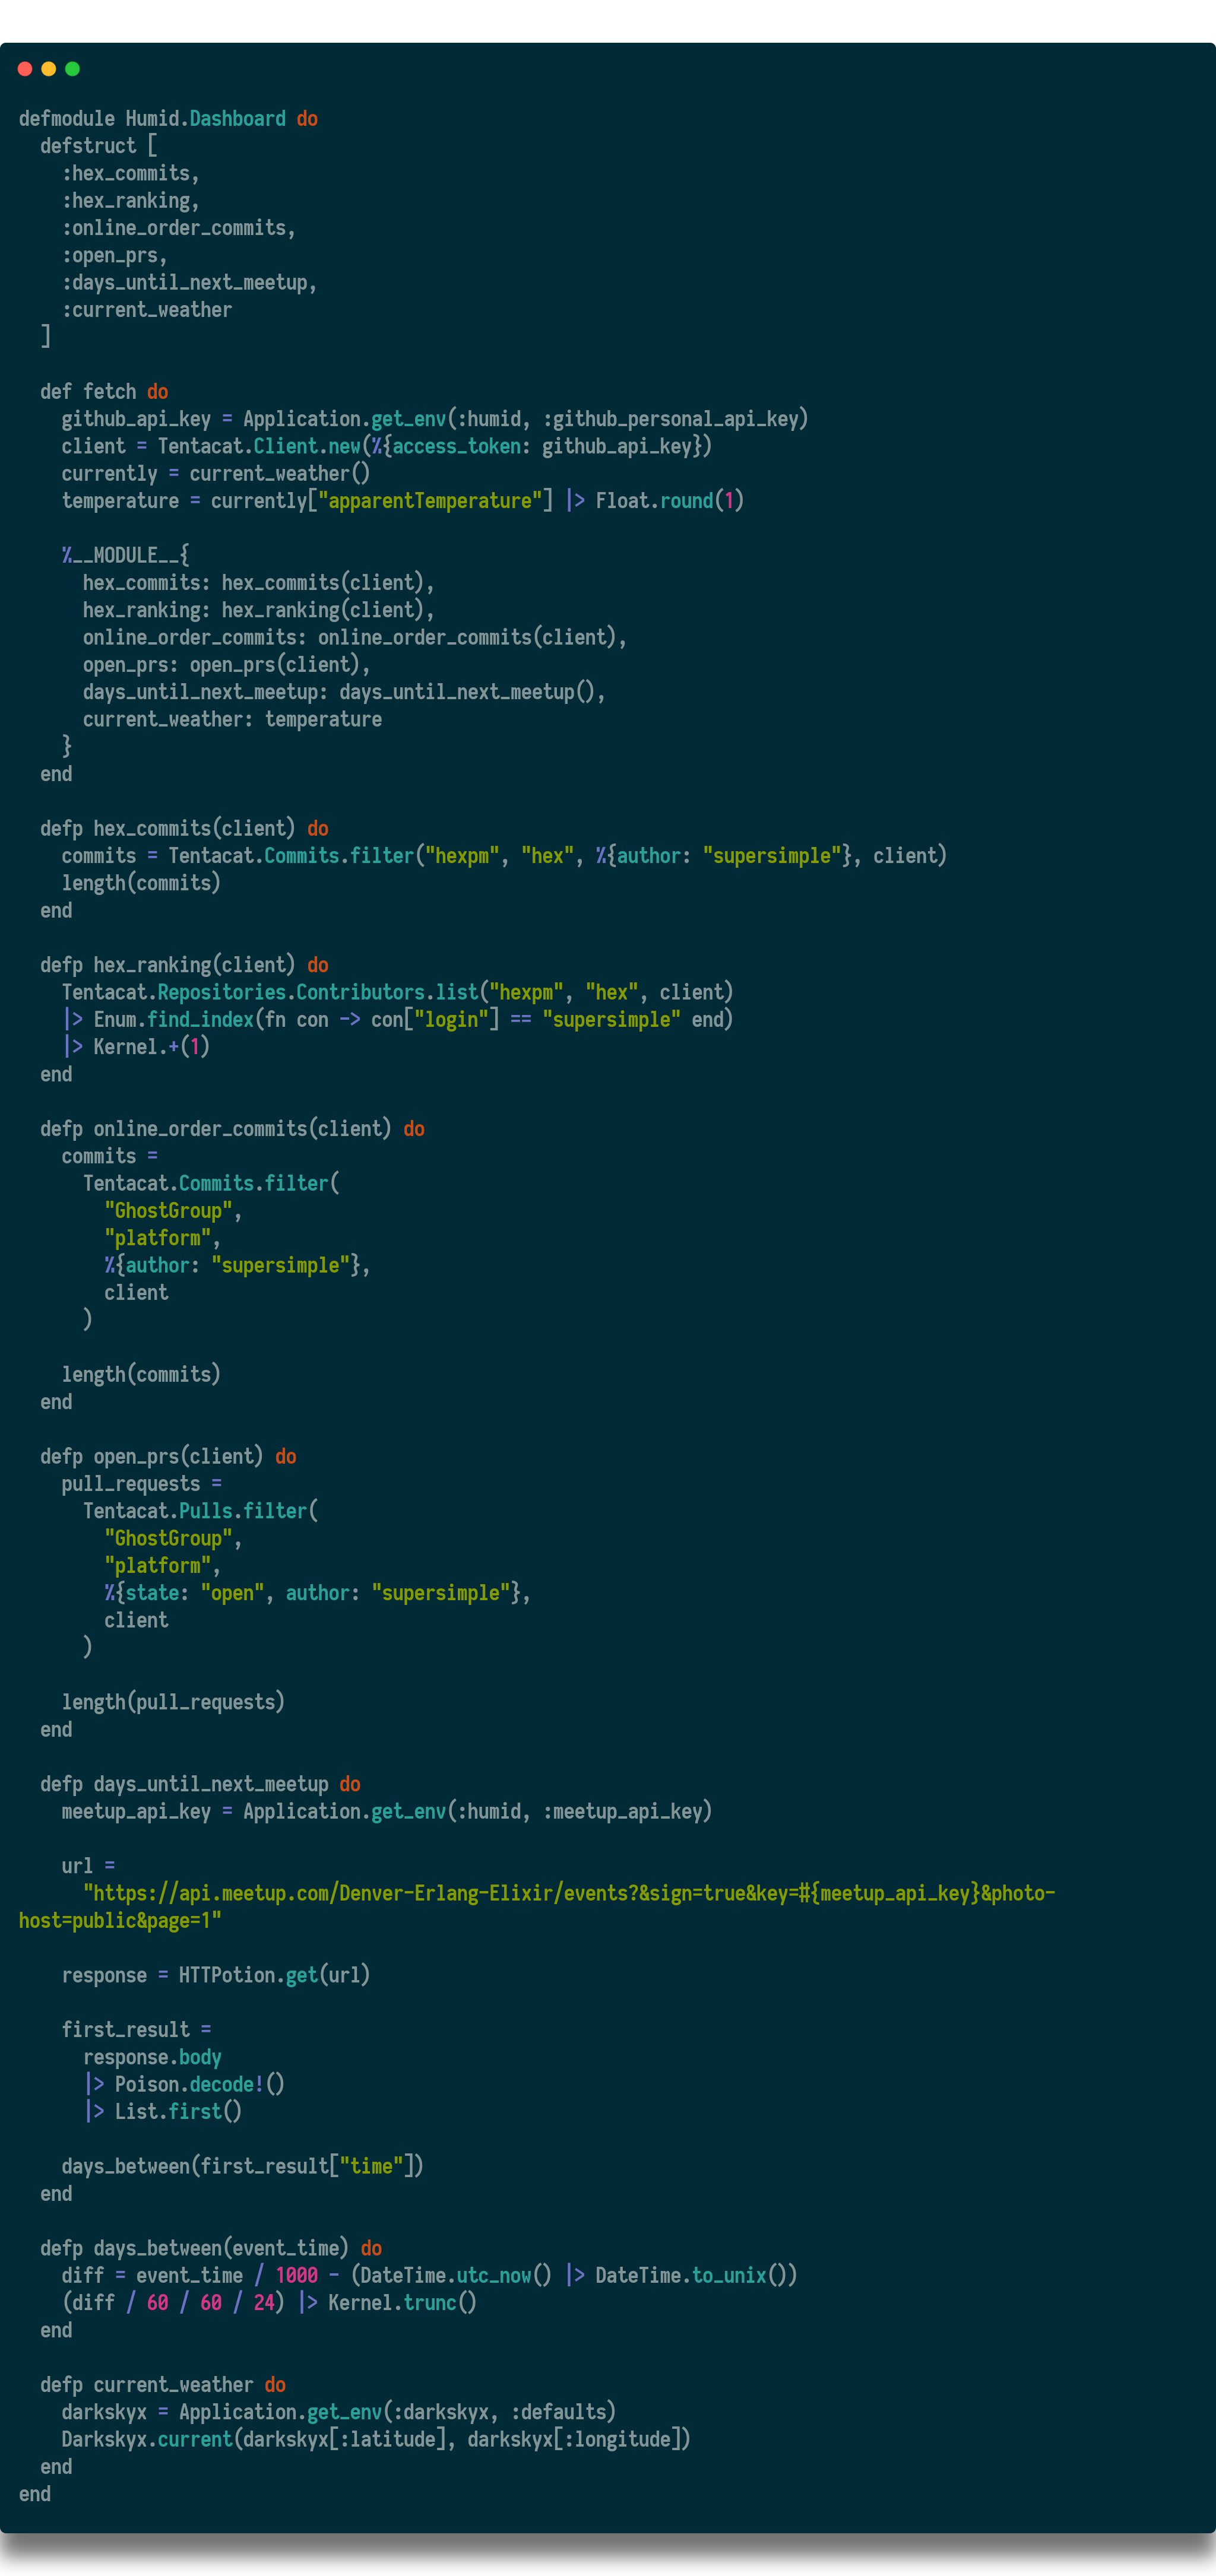
One of the first decisions I made on this project was what data I wanted to show on my dashboard. I decided I wanted basic information like time and date, and also the current temperature. In addition, I wanted to track my github contributions on hex, and my current position in the list of contributors. Also, some data around my github contributions at work. Finally, I wanted to show the days until my next meetup.
Fortunately, there were API wrappers available on hex.pm for Github and Darksky (used for weather conditions.) Meetup does not have an API wrapper for elixir yet, so that required a little more work.
For the time and date, I opted to use javascript. Not react, angular, vue, next, ember, or whatever the framework du jour is. Just regular old javascript.
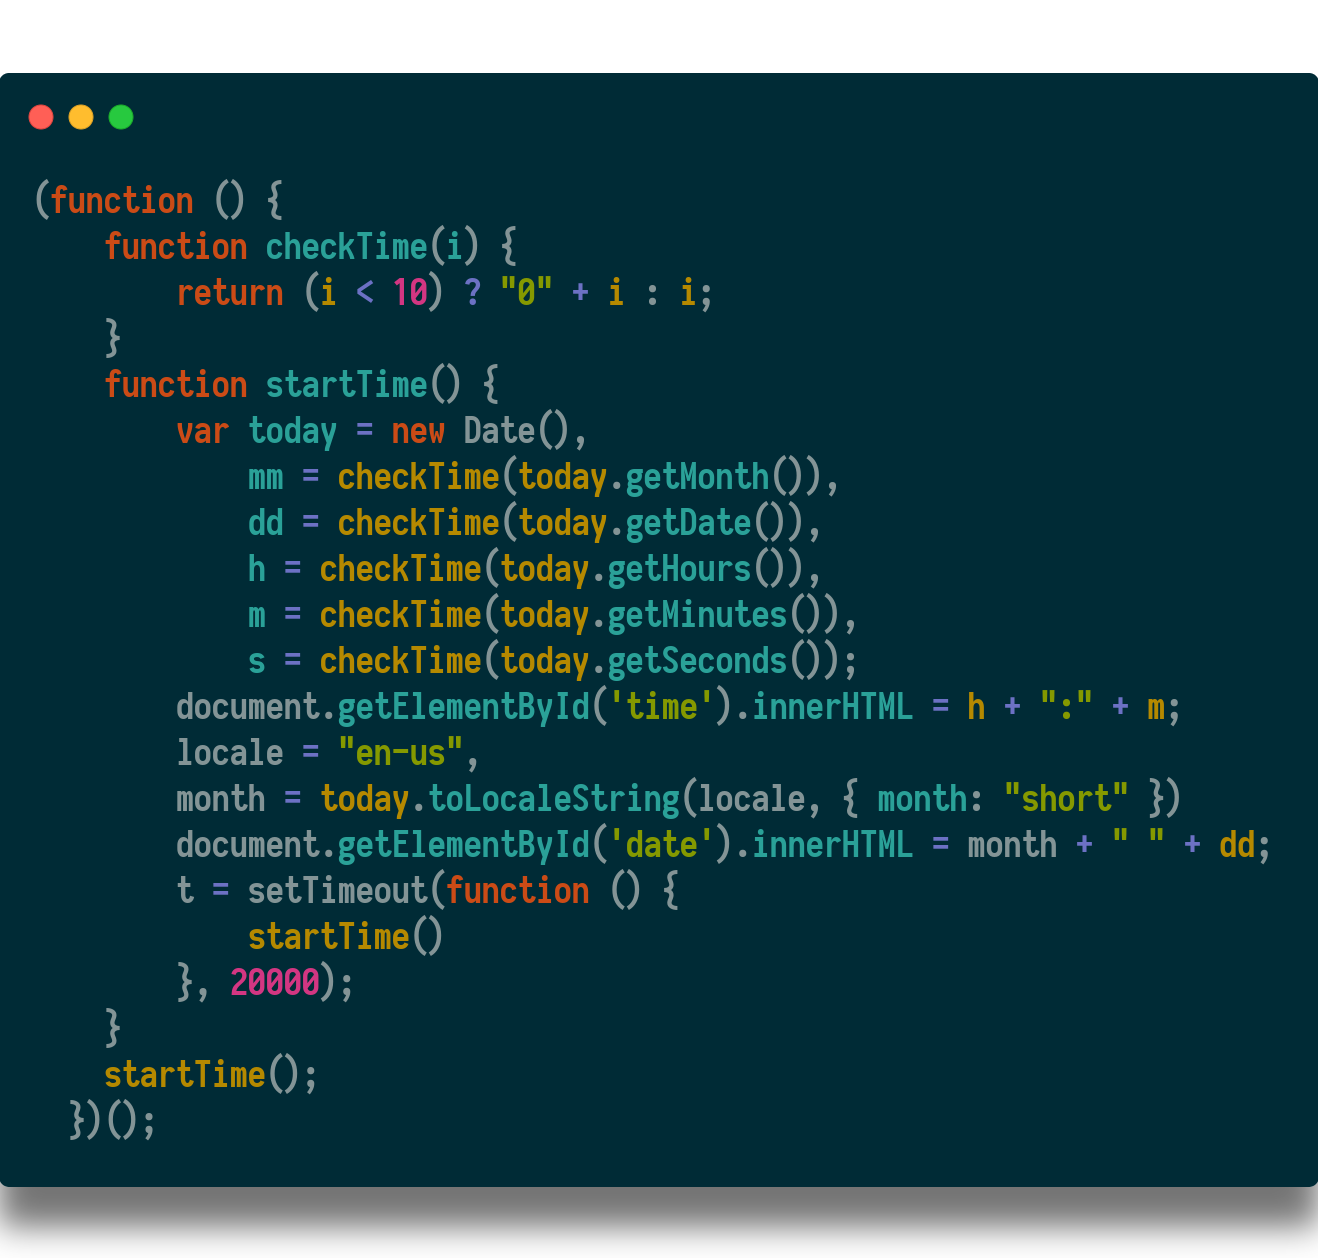
There are examples online of updating the time and date using elixir, but I thought that was probably overkill.
For the other data, I wanted to keep the data fresh, but it didnt need to be updated every second or even every minute. I opted for a genserver that calls itself every 15 minutes.
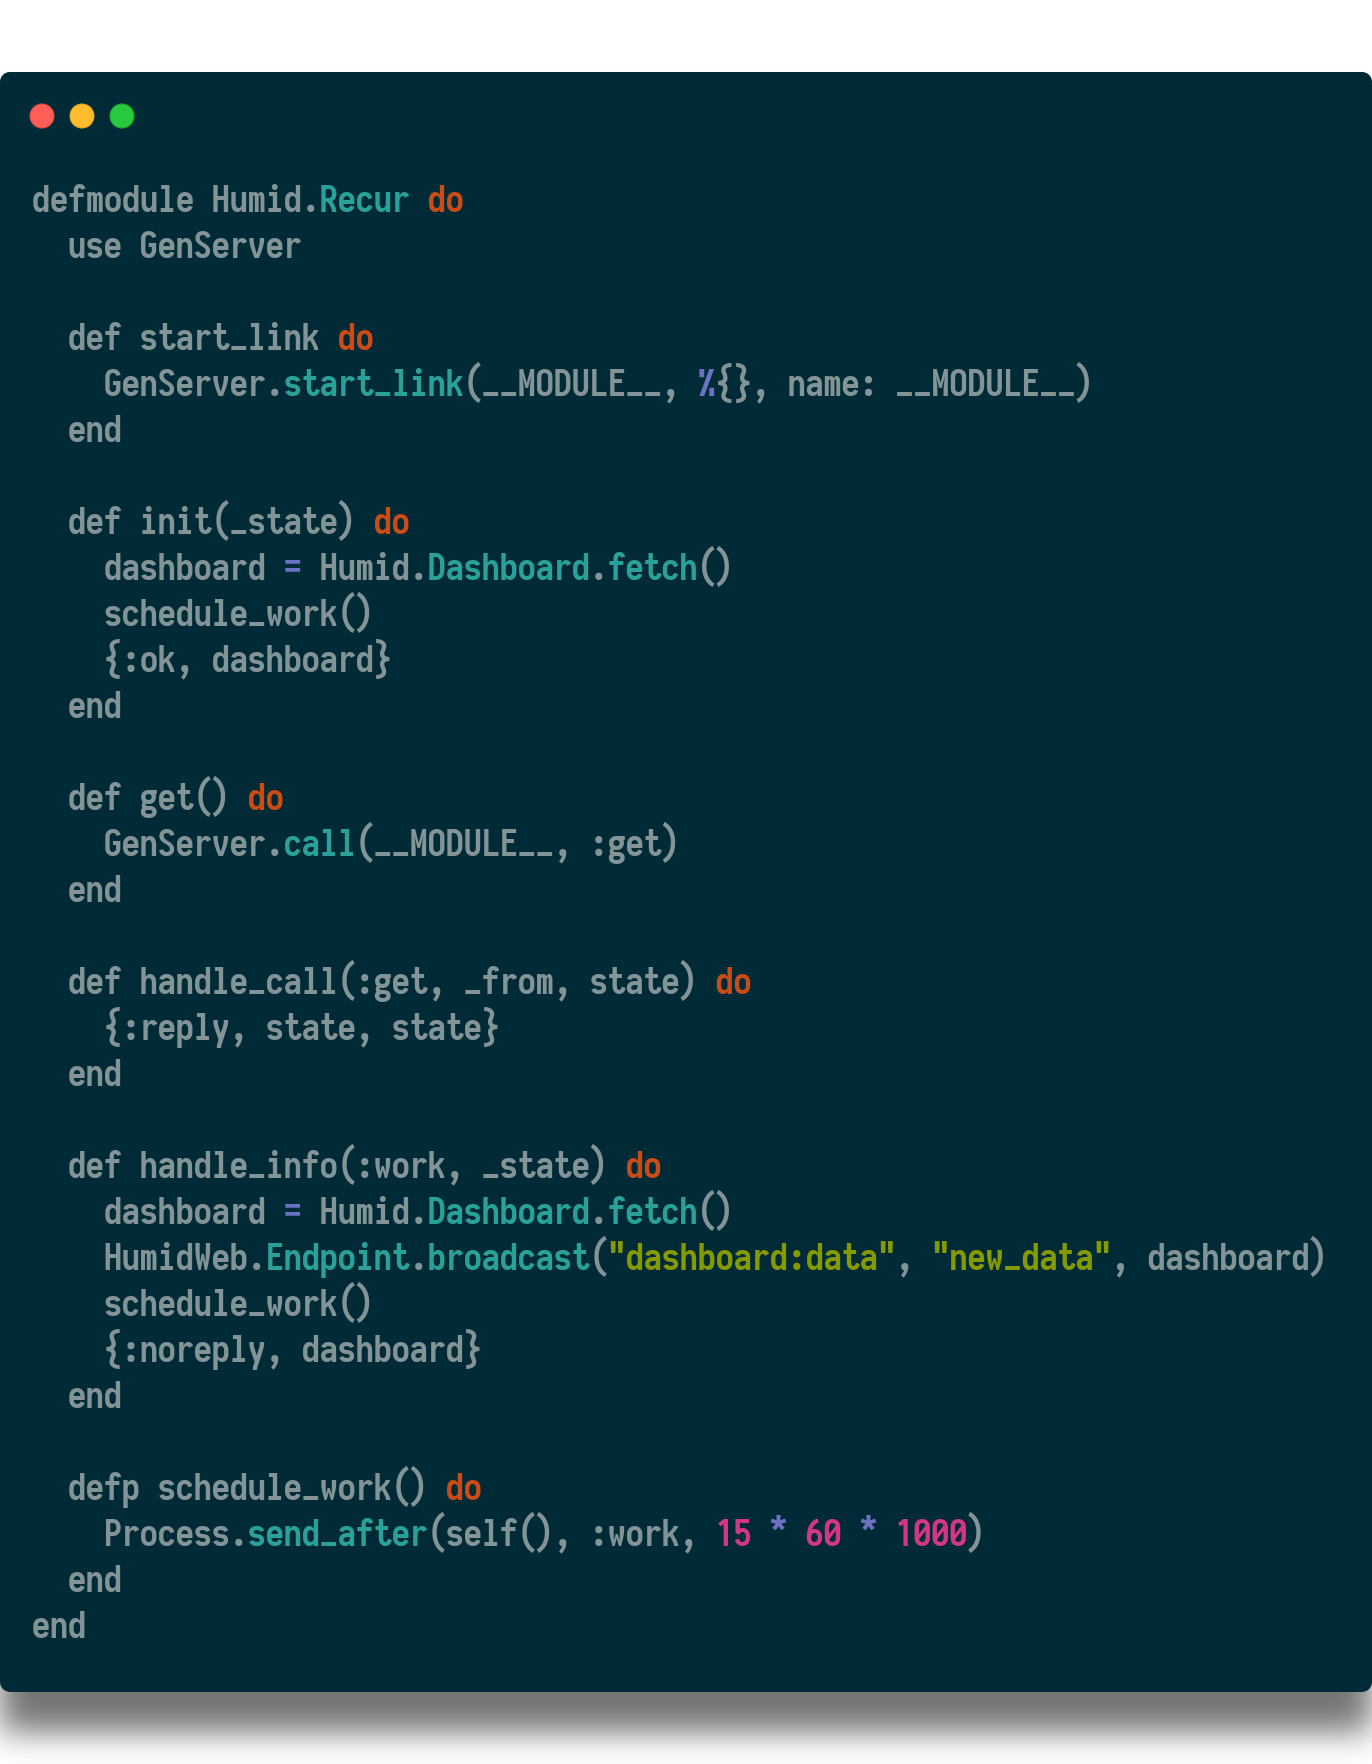
Since the data being updated doesn’t change that often, I chose an interval that would keep the data fresh without hitting the APIs so often that I might risk getting rate-limited. This is still a work in progress, so I may reduce this timing in the future.
You can see on line 30 where I set the interval. On line 23 is the call to get all the data for current dashboard state, which is then broadcast via a channel on line 24.
Each time the genserver calls itself, this code is processed. It builds a data struct and passes it along via websockets to the view to update.
Part 2: Hardware
The dashboard starts with an available monitor. In my case, I have a 49 inch Vizio TV in my office that only gets used to watch baseball day games about 20 times per year. That means most of it’s life is spent idle.
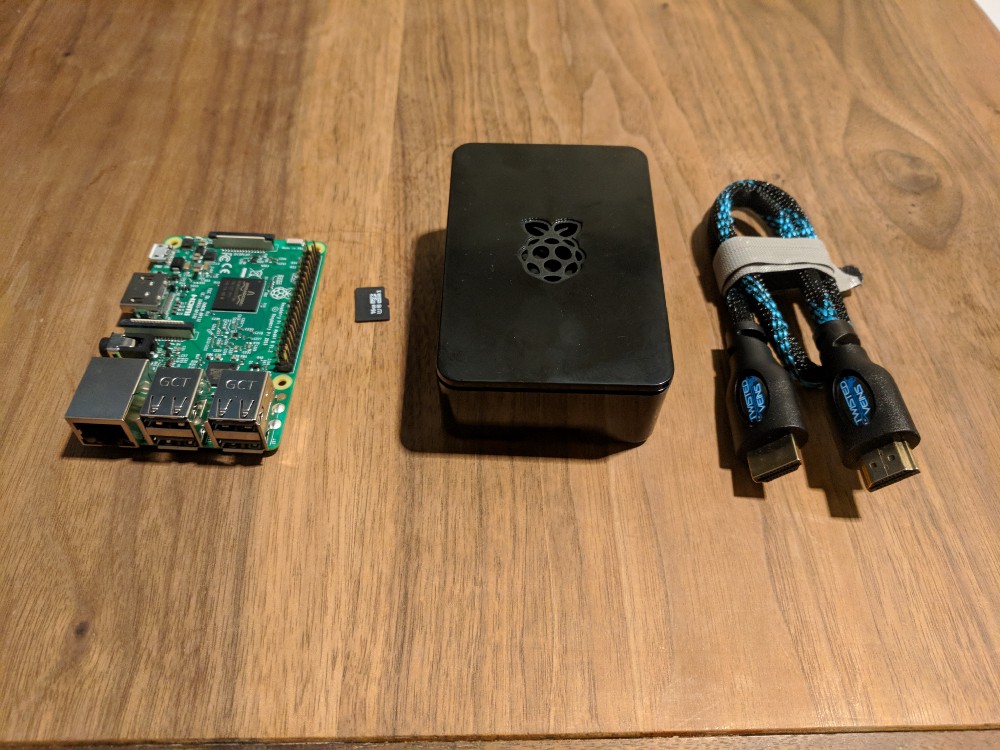
I decided to use a Raspberry Pi 3 to run the phoenix app. It could also be run on a mac mini, or some other small computer, but I chose the Pi for a few reasons:
- It is cheap. A Raspberry Pi 3 costs between $29 and $35.
- It is powerful enough to never be a problem. It has a 1.2Ghz quad-core ARMv8 processor.
- Wifi. This particular Pi has a built-in wifi chip.
- There are Erlang and Elixir builds available for ARM chips.
In addition to the Raspberry Pi, I used:
- A 16GB microSD card (acts as the SSD on the Pi): $9.99
- A case for the Pi (optional): $7
- A short HDMI cable: $4
In total, this puts the build at $50 (not including the cost of the monitor.)
Part 3: Deployment
For me, this was the most difficult part. It means getting the Pi to run elixir, but also to start up the app when the Pi powers up, and opening a browser, and hiding all the browser chrome.
Step 1 is to download an operating system onto your Raspberry Pi. The most common OS, and the one I used is Raspian.
Next, you will need to burn the OS image to your memory card. To do this, download Etcher by Resio.io. It is available for MacOS, Windows, and Linux.
Since this project requires internet access to get weather forecasts, next you will need to setup the Wifi on your Raspberry Pi. You can find detailed instructions on raspberrypi.org, but it is pretty simple.
The quickest way to enable wireless networking is to use the command line raspi-config tool.
sudo raspi-config
Select the Network Options item from the menu, then the Wi-fi option. On a fresh install, for regulatory purposes, you will need to specify the country in which the device is being used. Then set the SSID of the network, and the passphrase for the network.
Next, you will want to set the system time on your Raspberry Pi. From the Raspian desktop, select Menu > Preferences > Raspberry Pi Configuration > Localisation
Since this project will be running in a full screen web browser, we’ll need to download Chromium. To get started, update the package manager and packages with: sudo apt-get update && sudo apt-get upgrade -y
That step will typically take a little while, so feel free to refill your beverage at this point.
Once that has completed, install chromium and xserver utils; sudo apt-get install chromium-browser x11-xserver-utils
And then get erlang and elixir installed. There are very succinct instructions available on elixir-lang.org. Erlang Solutions also has very thorough instructions on building a beam server on a Raspberry Pi (or any other ARM processor computer.)
Terrific!
Now we will setup SSH. You can find detailed instructions on raspberrypi.org. In Terminal type: ifconfig. Make note of the IP next to the line that starts wlan0.
Now you should be able to access your Pi via SSH. From another computer, type: ssh pi@<IP-ADDRESS-HERE>
The default password is: raspberrypi
Almost done.
On the Pi terminal, type: raspi-config and activate the option for “wait for network”. While you are there, this is a good opportunity to change your password from the default to something a little more secure.
Newer versions of Raspbian default to Wayland. The code in this tutorial works on X11, and you can switch to X11 in raspi-config as well.
The last step is to change some config files on the Raspberry Pi.
Next, there are some special files used by the Raspberry Pi OS to startup the machine and put into a proper kiosk mode.
Now type:sudo nano /etc/lightdm/lightdm.conf Look for the line that starts with xserver-command and change it to:
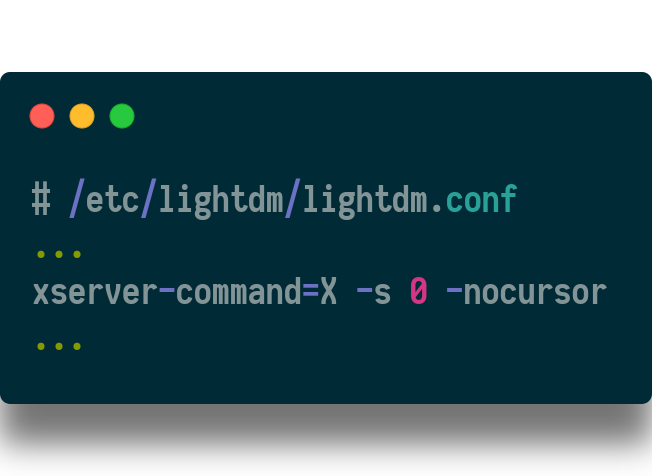
This will tell the Pi not to go to sleep and not show a cursor.
Finally, type: sudo nano ~/.config/lxsession/LXDE-pi/autostart and add these contents:
(note: in newer releases of Raspian, this file is located at /etc/xdg/lxsession/LXDE-pi/autostart)
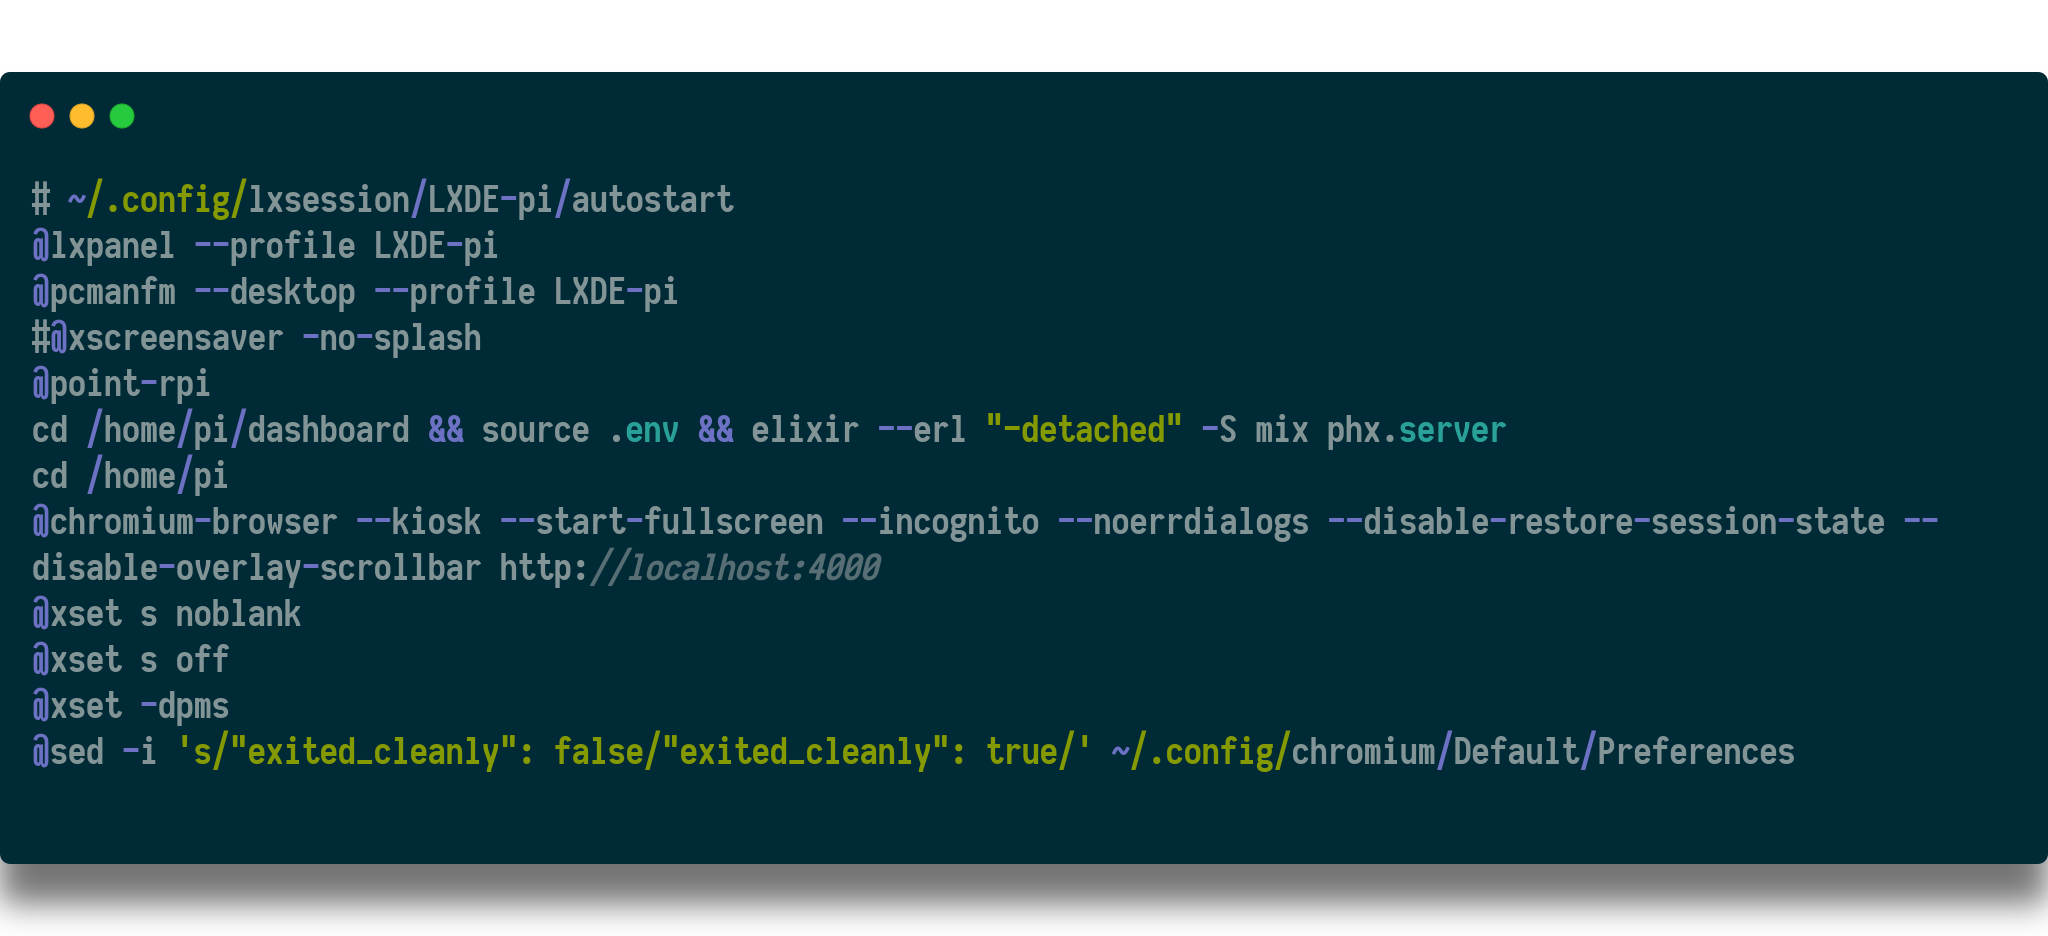
This file will start up the browser in kiosk mode, hide any error dialogs and the browser chrome, and start the phoenix app using mix. (notice I have the app saved to /home/pi/dashboard, and have my ENV VARs exported from a file called “.env”.)
Raspberry Pi 4 is capable of 4k video. However, chromium doesn’t seem to play nicely with 4k resolution in kiosk mode. I recommend scaling down the resolution to 1080 on your display if it is capable of 4k. The RPi4 will try to match it’s oputput to the display, so you really need to persuade it to start up in 1080. If you try just changing the display settings via UI, it will reset after a restart.
Force 1080 on startup by adding these 2 lines:
hdmi_group=1
hdmi_mode=16
to this file: /boot/firmware/config.txt
In conclusion, making a personal dashboard is pretty easy and also inexpensive. It’s a great way (especially for those of us that work from home) to keep an eye on our personal goals.